
Last updated on March 5th, 2021 at 08:41 am

Say cheese with these delicious and easy corn balls packed with paneer, cheddar, mozzarella, and corn. This restaurant famous appetizer comes together in under 30 minutes in your kitchen!

Hey guys! How are you?
It is was a cold morning here in my place; the weather forecast predicted rains this evening. Since I can never not snack when it rains, I made some cheese corn balls. Although, my daughter and I watched the clouds go right past our town. We ended up snacking on these cheesy corn balls without the rain. Lil A couldn’t keep her hands off it and it got me thinking.
There was a time I hated cheese, unbelievable right? Honestly, in my defense, I had only tasted processed cheese and had no idea about the cheese world. I wasn’t a fan of paneer too! My roommate/ best friend, who is a cheese lover introduced me to cheese; she would add cheese to almost everything, even dosas. And what do you know, it grew on me.
I tasted some of the good cheese and then some amazing cheese. As a result, I quickly became a cheese lover. These events happened just around the time when I became lactose intolerant, or to be precise lactose sensitive. Above all, when I was forced to give up milk, the cheese came in rescue. I was able to get some calcium and gorge on it. Anyway, cheese corn balls have always been my favorite. It was one of my goto appetizers under the vegetarian category.
Cheese corn balls:
Cheese corn balls are one of the most fool-proof recipes and that’s why it’s my favorite cheese appetizer. Luckily these can easily be frozen and deep fried later for when you have guests over. And when they ask you “Oh wow, you made this?”. You can act all nonchalant and say “Oh yes. It’s no biggie”.
Ever since I first tasted it, I wanted to make it at home. The restaurant style corn balls were sweet and had all the amount of cheese I wanted! However, it seemed like it didn’t have to be that very sweet. The restaurants add too much sugar, too little corn and probably a “bit” of artificial cheese. The filling was really easy to figure out; with a few tweaks, I got the perfect recipe.
I had some trouble getting the outer shell right though. When I tried this at home the first time, I had mixed in all purpose flour with water for wet batter. And breadcrumbs for final coating. But, it was a major fail! The cheese corn balls just split so neatly (well, messily), from the outer coating in the oil. To clarify, the cheese came in contact with the oil and there were lotta spluttering.
After a lot of research, I was able to get a perfect coating. Exactly the way we all like in cheese corn balls, chicken nuggets, etc.. Crispy barrier between the outside world and the cheeeeeeese inside; the one which makes such appetizers addictive. A 1:1 ratio of corn starch and all purpose flour works beautifully. Most importantly, the corn starch holds everything inside together.
How to make these:
This recipe is as easy as it gets. You just mix it all up, dip and fry! This is the case when you use frozen corn kernels. If you are using fresh ear of corn, you’ll have to cook it before use. I use one cob of sweet corn to make these. However, if corn isn’t in season or it isn’t available, you can use frozen corn kernels. I’m going to use a cob today for this recipe. The quantity for frozen corn is given in the notes below.
To cook the corn, I usually remove the outer covering, hold the corn at both ends and split it into two. I pressure cook it with a little bit of salt and then remove the kernels manually, one by one. Yeah, I hear you, it is painstaking. I do that when I’m totally bored and when I’d like to see some whole kernels. Frankly, it doesn’t matter at all. Pick a sharp knife and run it through the sides. Making sure the knife runs closely to the core. The kernels come out so easily this way. If you’re bothered about the leftover kernel stuck to the core, run the knife over again.
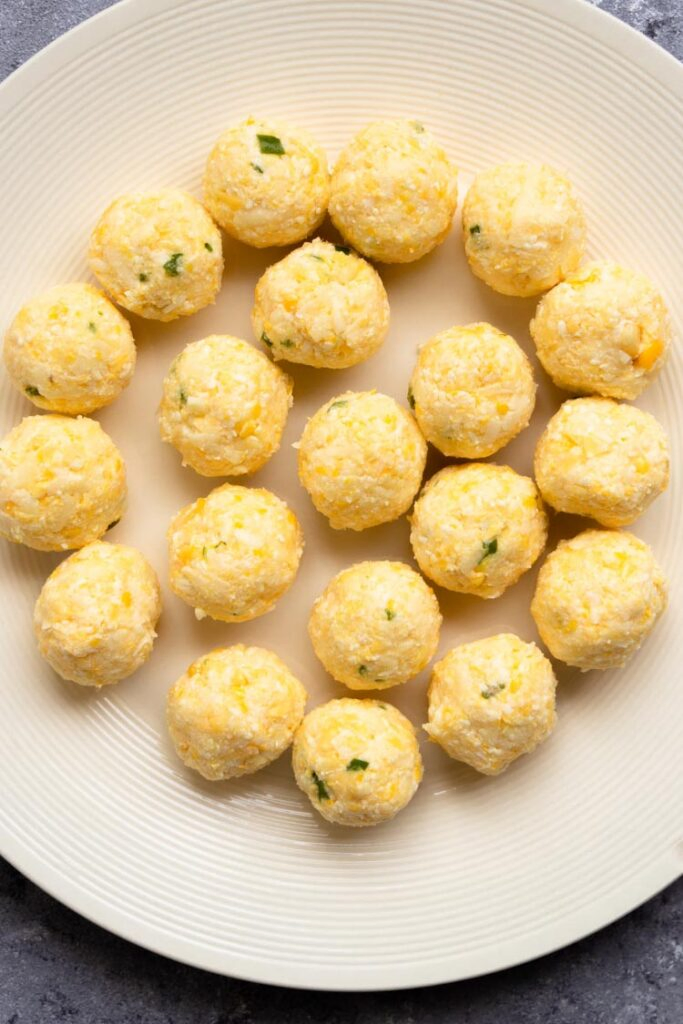
Put the corn kernels into a food processor and grind it coarsely. The pulse mode would work well. Now, this is the relatively hard part of this recipe. Next comes the cheese, grate the paneer using the smallest hole shredder on your grater. Next comes the cheesy cheese, mozzarella, and cheddar. To get those gorgeous stringy cheesy threads when you twist open a cheese cornball, you need mozzarella to be really present. You can either chop it into even little pieces or use the biggest hole shredder on your grater. About 150g mozzarella would do.
Seasoning:
Normally there’s little to no seasoning in the cheese corn balls done in the restaurants. A few add some pepper and some add green chillies. I find that the green chillies go very well with this. Chop up two green chillies to fine pieces and add them to the ground corn. Tip the grated paneer into the ground corn. Add salt and sugar and mix it thoroughly. Add the mozzarella into the corn mixture and gently bring it all together. You don’t wanna break it.
Coating:
For the outer shell, mix in one cup of all-purpose flour and 1.25 cups of corn starch. Pour in enough water to form a runny batter. In another wide bowl or a tray, spread an inch of breadcrumbs. Make even sized balls out of the corn and cheese mixture. Heat enough oil in a deep pan. Quickly dip each ball into the wet batter and carefully but swiftly roll it in the breadcrumbs.
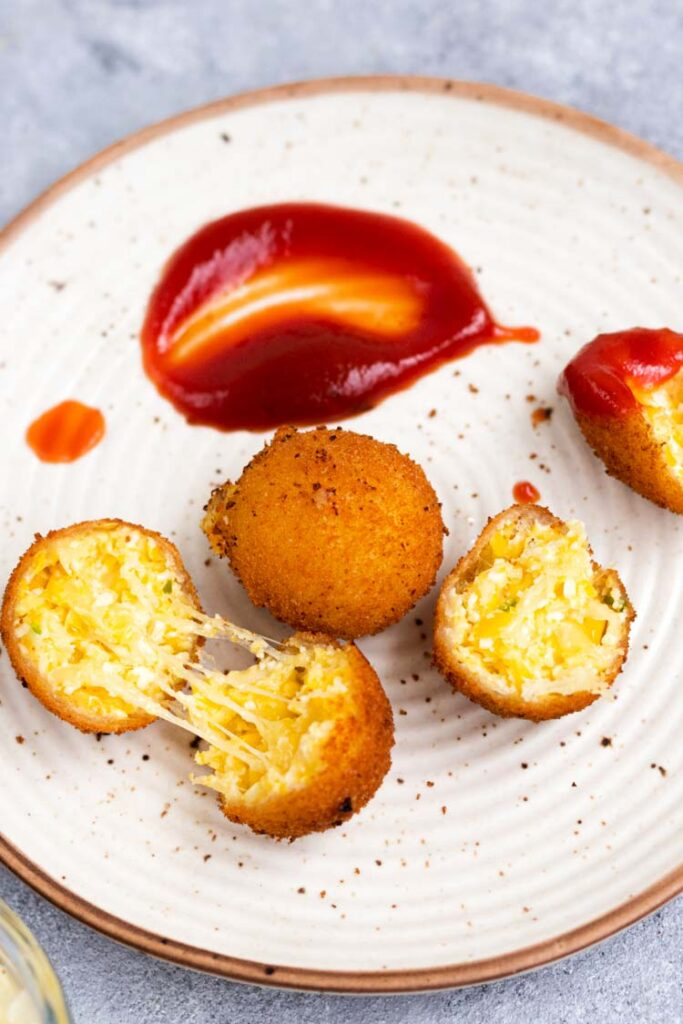
Give a very gentle press to push the breadcrumbs into the wet batter. Drop two to four balls (depending on the size of your frying pan), into the oil. Fry in medium flame till golden brown. Let the oil drip, for example, in a small colander or blot it on a tissue paper. For the most interesting part, make a small cut and pull it apart to see the cheese refusing to break. Now take a bite while it’s still hot. Mmm…lip smacking. Lol. Serve it hot with ketchup or eat it plain (just as good). Actually, in my house, these get over so quick before I can blink.
Certainly great when you have guests over. They’ll be fighting over it. Ensure to cook it right before you serve. I’ve seen that it doesn’t microwave well. If you have any ideas about that, please let me know in the comments below! If somehow you have leftovers, follow all the steps till rolling in the breadcrumbs. Place them on a tray and freeze for about 3 hours. Then, put it in a freezable box and freeze it. To reuse, thaw it overnight or for 5 hours before frying.
Recipe courtesy: This is my own version of this starter; I was able to guess the ingredients in restaurants’ cheese corn balls. The recipe for the outer skin or coating was obtained from multiple resources.
Notes:
- Alternatively, if using fresh corn, cook the corn with a little bit of salt until soft. Remove the kernels by running a knife over the sides.
- You can simply use just mozzarella or just cheddar or a mixture of both.


Cheese Corn Balls recipe
Ingredients
- 200 g Frozen corn kernels*
- 100 g Paneer or Ricotta or Cottage Cheese
- 150 g Mozarella or Cheddar cheese (or a combination of both)
- 1 tsp Sugar
- Salt as required
- Oil for deep frying
For the outer shell:
- 2 tbsp All purpose flour
- 2 tbsp Corn flour
- Water as required
- 200 g Bread
Instructions
- Thaw the frozen corn by leaving it out in room temperature or immersing the pouch in tepid water. Once thawed, blitz the corn in a food processor to a coarse texture.
- Grate the paneer using the smallest hole in the grater. Likewise, grate the mozzarella or cheddar (or both) using the wide holes in the grater. Add only the grated paneer to the corn.
- Chop the green chillies into tiny bits. Add it to the cheese.
- Add salt and sugar to the corn. Give it a good mix.
- Now, add the mozzarella/cheddar to the corn mixture. Gently mix it in and make balls of even size.
- Line the balls in a flat pan; cover and refrigerate for at least 30 minutes.
- For the wet batter, mix the corn flour with the all purpose flour. Add water to make it to a thin batter.
- For the final coating, spread the breadcrumbs on a flat tray.
- After 30 minutes, remove the corn balls from the refrigerator. Quickly dip each ball in the wet batter and roll it in the breadcrumbs. Once the breadcrumbs are all around the corn ball, gently press the breadcrumbs in.
- Coat all the corn balls and refrigerate for at least 30 minutes.
- Heat oil in a pan for deep frying the corn balls.
- After 30 minutes, remove the corn balls from the refrigerator. Deep fry in batches of four or five, in low flame.
- Serve it immediately with ketchup or mayonnaise!
Notes
- Alternatively, if using fresh corn, cook the corn with a little bit of salt until soft. Remove the kernels by running a knife over the sides.
- You can simply use just mozzarella or just cheddar or a mixture of both.
Made this? Got doubts? Let me know what you think in the comments below!

Leave a Reply